
I'd love to say I was super prepared for the edit this week....that I've been waiting anxiously for days to share it....
Truth is, I have a very sick little 2 year old at home (again), and I've had a bunch of photo sessions this week, so I'm not nearly as prepared as I'd like to be...
On the plus side, I did have enough forethought to share a little tutorial with ya'll on color cast.
I know Ashley covered it on her blog, but the way I do it is a little different. See, sometimes you have color cast throughout the whole photo (i.e. everyone in the photo looks to be a descendant of an Oompa Loompa), but sometimes you get color cast from something reflecting on the eyes or skin. (you guys remember my green baby before/after, right?) Here's how I do it...
SOOC

My adorable little
Obviously, a little dark... So, I hop into Lightroom to do my initial edits, as usual.
Basic Lightroom edit

So now, I throw it over into CS5....
Hmmm....do you see what I see? Probably not.....let me show you...
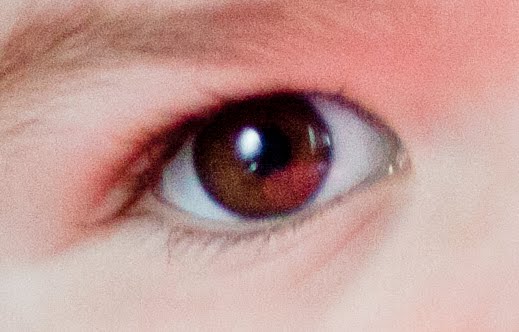
Catch-lights in eyes....good. Reflection of red heart toy light prop thingy in eyes.....bad. I know Valentines Day is the "Red" holiday and all, but I think red eyes may be a little more "Halloween" than "Valentines"...
Now yeah, I could use the clone tool, and make it look alright...but all the detail of her eye is there and correct....it's just the wrong color!
Enter "Hue" blending....Make a copy of the layer, and choose "Hue"

From here, select your paintbrush....make sure you're working on the new "Hue" layer.
Go over to where you have the color cast, hold the "Alt" key(gives you the eye dropper tool), and select an area that is the correct color. (In this case, the brown part of her eye).
Now let's talk brush opacity..

Usually I put my opacity at around 20 - 39% when I'm fixing color cast, but it does vary. It's a little bit or trial and error at this point to get the mix just right. Once you select an opacity, use the brush tool and brush over the area that is incorrectly colored. Having the layer in Hue blending mode only alters the color without touching the details.

Ah...... that's better. :) (I know there's still a little red around the eye...I took care of that after I took the screen shot)
Now, besides the whole "red eye" thing, I liked the basic edit....but I think it was a little too much red. I had the red backdrop up when I was taking shots of my other kiddos (who were not wearing red) and just left it up. Let's tone it down a little...
(Final Edit)

I like it :)
And just for fun, I tried a vintage preset I'd made a while back, and it actually removed most of the color. I'm not usually a big fan of selective coloring, but it kinda works for this Valentines Day shot. Still, the final edit is my favorite. :)
(vintage edit)

As for my other "heart thief" shots, I tried to do something a little different with each of them....but to be honest, I don't LOVE any of these following edits. I'm just exhausted and trying to get my wee one back to feeling healthy again. These middle of the night neutralizer treatments take there toll on you after a few nights!
SOOC

Edit

SOOC

Edit

SOOC

Edit


